Almost all modern devices like Mac, iOS, Android, and other comes with the ability to take a screenshot and so do the Windows 11 device. Whether it’s a Picture, Document, PC settings, or achievement in a game or video, you can take screenshots of whatever you want. In case, you’ve recently installed or upgraded to Windows 11, then you might be wondering how to take screenshots in Windows 11, right? Just like Windows 10, Windows 11 also offer various ways to take a screenshot. We have also covered a blog post on how to take screenshots in Windows 10.
How to Take Screenshots in Windows 11 PC | Laptop
Whether you want to take a screenshot of an active app window or full-screen or a particular area of the screen, we will share all the possible ways how to do that:
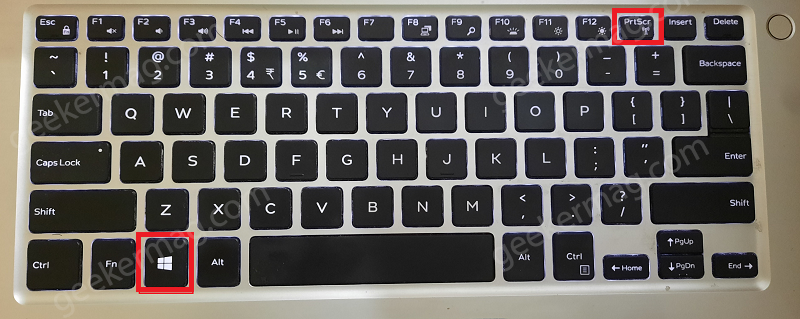
1. Take Screenshot using PrtScr (Print Screen) key in Windows 11
PrtScr is one of the oldest ways to take screenshots in Windows OS and the same works in Windows 11 as well. It’s a key usually available on the first row of the keyboard. You can use to take screenshots of the entire screen: Press PrtScr on the keyboard. Doing this will capture the screenshot of the whole screen and save it to the clipboard. Depending on your requirement you can paste it wherever you want. For example, you can paste it to the composer of WhatsApp, Email, Telegram, and others and share it. You can also paste it to your default photo viewer or editing tool, like Paint, and paste it by pressing. Later, you can edit it, and then save it to your computer.
2. Take Screenshot (Whole Desktop + Auto Save) in Windows 11
You can also use Windows + PrtScr key on your keyboard to capture the screen and save it automatically to the screenshot folder available under the Pictures folder. The process is simple: Open the website, app, and PC settings on your Windows 11 PC, and then press Windows + PrtSc. The screen will blink and it’s done. The screenshot will be saved automatically into the Picture folder. You can access it here: C:\Users(your username)\Pictures\Screenshots Replace “your username” with your computer username. In case, you’re using OneDrive to store images instead of the Pictures folder; then the screenshot will be saved to OneDrive > Pictures > Screenshots.
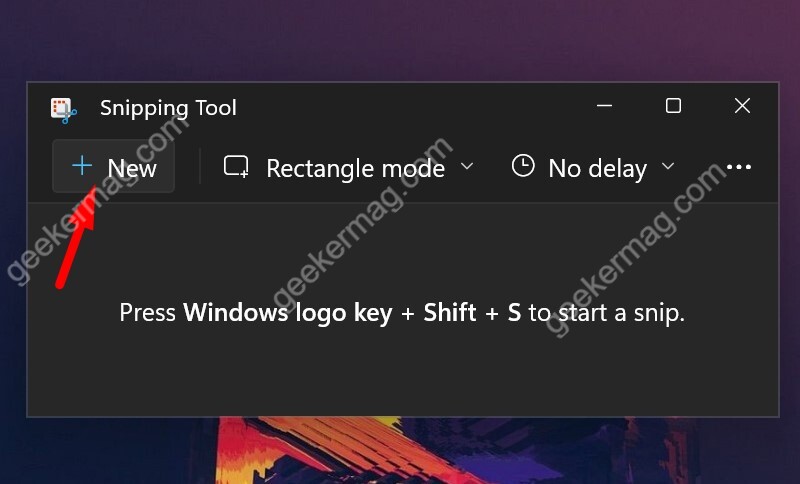
3. Take Screenshot of Particular Area in Windows 11 (Keyboard Shortcut)
In case, you want to take a screenshot of a particular area or region, it’s also possible. You can make use of WIN + SHIFT + S keys combo. When you use this key combination, the active screen will get blurred. Using the pointer, select the specific area which you want to save as a screenshot. In the notification area, you will receive a notification about a screenshot, clicking on it will launch the same snipping tool from where you can save it. During this time period, the same screenshot will be copied to the clipboard as well. So if you don’t want to use the Snipping Tool, then you can paste your preferred photo editor and save it. Basically, it works just like the PrtScr tool except here you can select an area for a screenshot.
4. Take Screenshot of Active App Window (Current screen) in Windows 11
In case, you want to take a screenshot of a specific app or current display, then you can take the help of the ALT + PrtScr key combo. Here’s what you need to do: The process is simple, press the ALT+ PrtScr button simultaneously and a screenshot of the active app will be copied to the clipboard. As discussed above, launch the preferred Photo editor, let’s say Paint, and save the screenshot to your computer. For example, if you’re using the Settings app in Windows 11, and you want to capture a screenshot of the active settings page, then use a key combo, and the system will automatically check the active app and save it with the same dimension. This key combo is handy for writers who cover tutorials.
5. Take Screenshot using Snipping Tool
A snipping tool is a default tool in Windows OS that allows users to take a screenshot and edit it. With Windows 11, Microsoft also updated the Snipping tool with a new UI. Here’s how you can use the Snipping Tool to take screenshots in Windows 11. Click on the Start button and type Snipping Tool in the search box, when the same app appears in search results, click to open it. Now click on the New icon to select the area for a screenshot. Press left click on your mouse and select the area and then release the left mouse button. Once done, you will see more options using which you can edit the screenshot. After making changes to the screenshot, click on the Save button to save the image. What makes the snipping tool better than other options available to take a screenshot is the dedicated screenshot options it offers. Use Snipping mode in the Snipping tool which includes four-mode discussed below:
Rectangular Snip: This allows you to take screenshots of selected areas or regions.Freeform Snip: You can take screenshots of free-form shapeWindow Snip: Let you take a screenshot of the active app window.Fullscreen Snip: Grab a screenshot of the entire screen (same thing as PrtScr).
Depending on your requirement, you can select one before taking the screenshot. Delay snip is another nifty option using which you can add a delay before taking the screenshot. Out of the box No delay is selected, you can add delay from 3 seconds to 10 seconds. Using Delay snip, you can take delayed screenshots in Windows 11 using the Snipping Tool. For that, click on the New option in the Snipping Tool. From the Delay snip menu, select the time period for which you want to delay the screenshot. Once done, you will get a few seconds to sort out things.
6. Take Screenshot using Xbox Game Bar in Windows 11
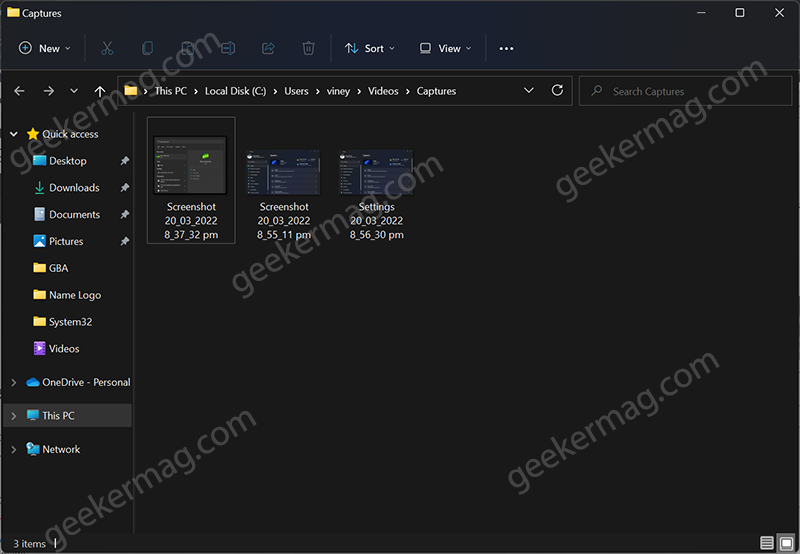
Xbox Game bar is a nifty app dedicated to gamers that give instant access to widgets for screen capturing a screenshot or video gameplay accompanied by other options. You can also use the Xbox Game bar to take screenshots in Windows 11. Here’s how you can do that: Open particular settings, apps, or webpages of which you want to take screenshots and then press WIN + ALT + PrtScr. Instantly, the Xbox Game bar will take a screenshot of the active window, you will see notifications about it as well. Clicking on it will take your area where all the screenshots are saved in the Xbox Game bar. Or you can directly visit here: C:\Users\yourusername\Videos\Captures
7. Use Microsoft Edge to Take Screenshot in Windows 11
Microsoft Edge is the default web browser that comes preinstalled in Windows 11. It has a native screenshot tool called Web capture. In case, you’re using Edge as a default browser, then you might want to learn how to take screenshots in the Edge browser.
Take Screenshot on Microsoft Surface Device running Windows 11
Hardware Keys: This method is used to capture the whole screen just by clicking the Window key + Volume down button.Just an App: Press and hold the Alt key on the right side + fn button and then press Space.Surface + One Note: Using Surface Pen, double-click on the top button and select the area you want to capture, and drag it to One Note to save it.
So these are possible ways using which users can take screenshots in Windows 11. Why don’t you try that method and let us know your favorite method in the comments?