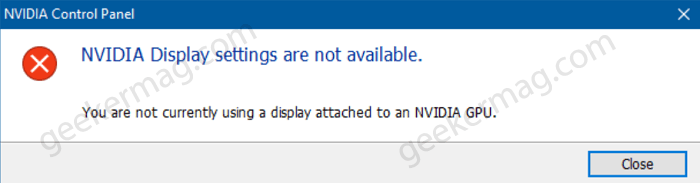
Usually, this error message appears, if the display is connected to the wrong port or due to a driver’s issue. If you land up to this blog post, then it is possible that you’re seeing the same error message. In this blog post, we have gathered all the possible solutions that work well for the majority of the users in fixing the same issue. Let’s start with the first solution:
Check Ports
Usually, this error message pop-up when you unwillingly forgot to plug the monitor into the motherboard, not the graphics card. So it’s a clever move to check if the display (monitor) is plugged in the right port. If you have more than one port, remember that one of them is the port to connect your motherboard and another one is to the Graphic Card. So, switch the port and check again if the error is resolved or not.
Uninstall and Reinstall Driver
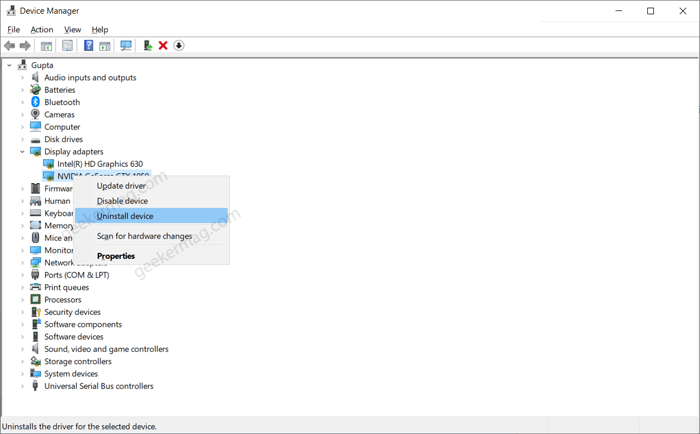
If that doesn’t fix the issue, please reinstall the display adapter drivers. For that, here’s what you need to do: Press Windows key and X key together. Select Device manager. Locate and expand Display adapter. Right-click on the Display adapter that is listed and clicks “Uninstall“. When the confirmation dialog appears, click Yes to continue. After that, launch Settings > Apps & Features. On the right side, look for NVIDIA Graphic Driver app and if available, click Uninstall button twice. Close everything and reboot your computer. After that, download and install the latest drivers from the NVIDIA website.
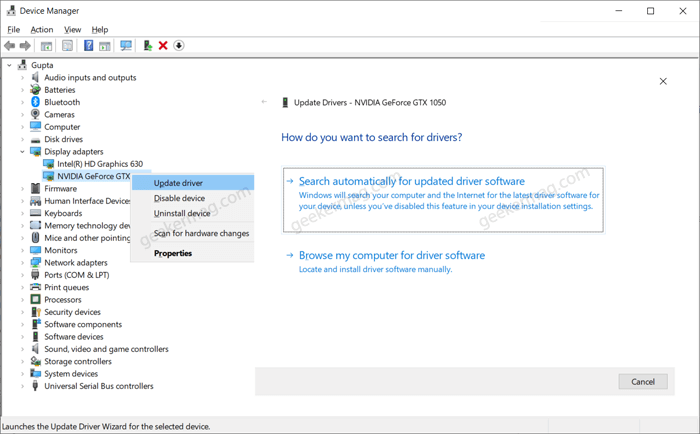
Update Display Adapter Drivers
Right-click on the Windows button and then select Device Manager. Double-click on Display Adapter and then right-click on it, select Update driver from the menu. Next, select Search automatically for drivers. If the latest version of the driver is available, it will automatically download and install.
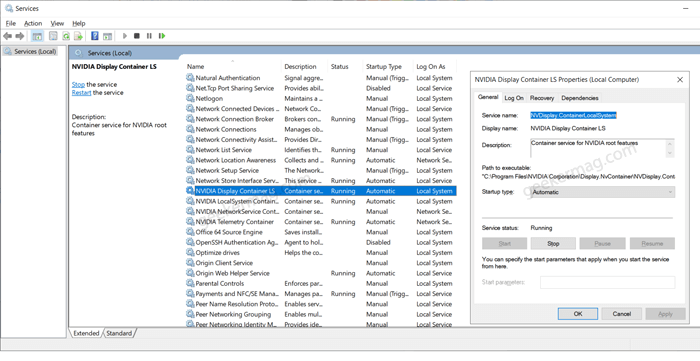
Restart NVIDIA Services
Press WIN+R to open Run dialog and type ‘services.msc‘. Now, scroll down and search for ‘NVIDIA Display Container LS‘. If the status is disabled then right-click on the settings and press ‘Start‘, this will enable the status of our GPU’s display settings. Double click on the settings and change the ‘start-type‘ to ‘Automatic‘. ‘Apply‘ the settings and press ‘Ok‘ to close the dialogue box. Restart your system.
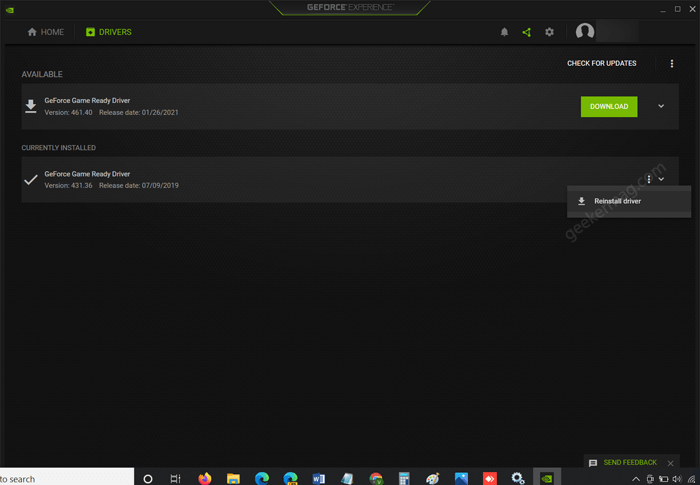
Reinstall Driver via GeForce Experience
Some users suggested that they fixed is the issue by reinstalling driver via NVIDIA GeForce Experience app. Here’s how you can do that: Download Geforce Experience app from NVIDIA Website and install the app just like any other app. Next, launch the app and then switch to Driver available on the top. Under Currently installed section, you will find what version of driver is installed on the computer. You need to click on the three dot icon and select Reinstall driver. Wait for the application to reinstall the driver. So these are possible solutions that we confirm are working for users seeing ‘NVIDIA display settings are not available‘. In case, you know any other solution that worked for you, then share it with us in the comments.