According to some users, the Quick access feature on Windows 11 is having some problems. It started happening recently and often occurs after installing an update. Not any specific update, just Windows updates in general. If you are also experiencing the issue, we have a few troubleshooting tips for you. Keep reading this article to fix Quick Access in Windows 11.
Why is Quick Access Not Working?
There could be a lot of reasons behind Quick Access not working in Windows 11, and some of the most common ones are listed below.
Disabled Recent Files options Disabled Show recently opened items in Start, Jump List, and File Explorer Corrupted Quick access cache Unprecedented Quick access bug
Fix Quick Access Not Working in Windows 11
There are a few ways you can fix Quick Access in Windows 11. We have explained the working ones below. check them out.
1. File Explorer Options
If Quick Access is not showing recently opened files and frequently used folders, you need to check File Explorer’s Options. You can enable or disable recent files and other options for the Quick Access feature from here. So, here are the steps for it.
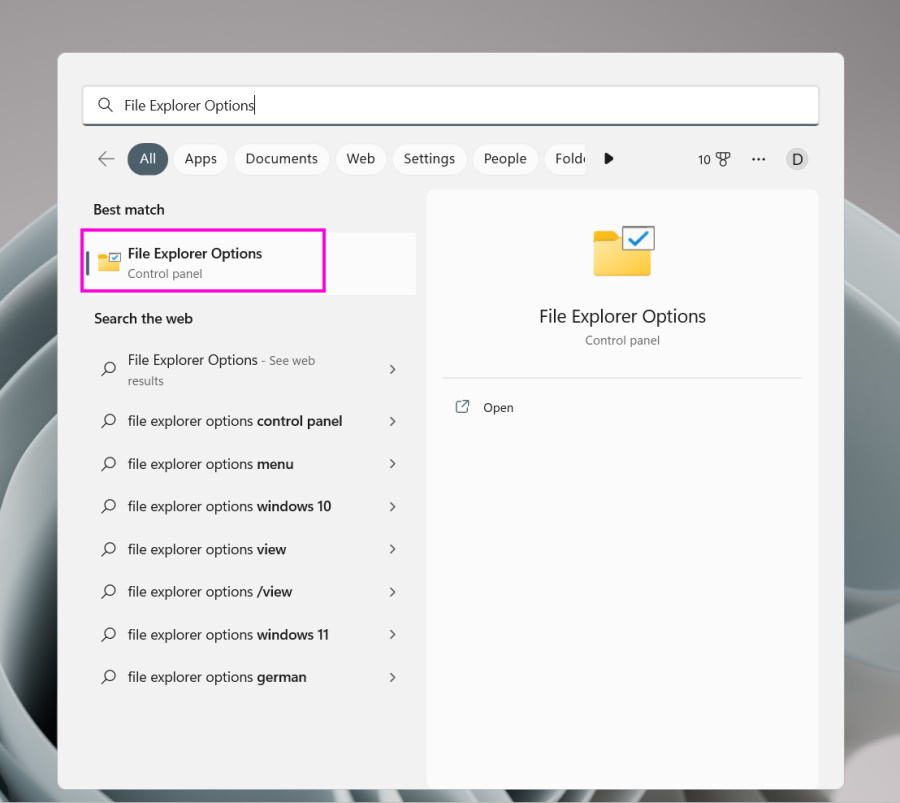
- Click the Search option on the Taskbar. Alternatively, you can press Win + S on your keyboard to launch the Search Menu.
- Then, search for File Explorer Options and open it.
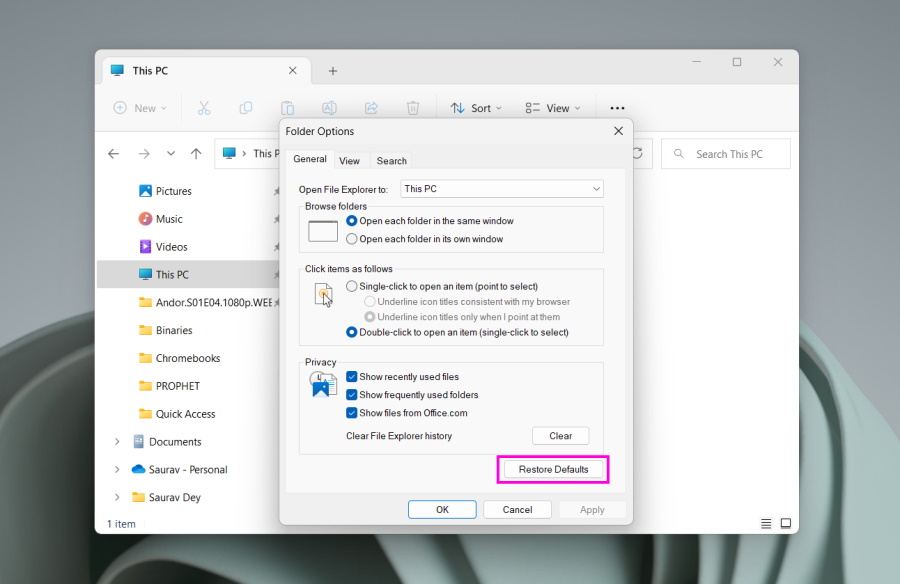
- Navigate to the General tab and check the boxes beside the following options. Show recently used files Show frequently used folders
- Lastly, click the Apply button below, followed by OK. Execute the steps correctly. After that, open a few files and folders and check if they appear in Quick Access.
2. Show Recently Opened Items in Start, Jump List, and File Explorer
Similar to the previous troubleshooting step, Quick Access may not show the recent files as the Show recently opened items in Start, Jump List, and File Explorer option is disabled. But this could lead to a complicated situation as enabling this option will also activate the recommended section in the Start menu, which some users would like to avoid. You can enable the option from the settings app, and here are the steps.
- Open the Start Menu and click the Gear-shaped icon to launch Windows Settings.
- On the Settings menu, select the Personalization tab.
- Click Start after that.
- Finally, toggle the switch next to Show recently opened items in Start, Jump List, and File Explorer. After the execution of these steps, all the recent files should appear in Quick Access.
3. Quick Access Cache
Cache data can create problems, and Quick Access is no exception. If Quick Access is not working or is slow or fails to open, the problem could be related to the Quick access cache data. In this situation, you must get rid of the cache data to fix Quick Access. Here’s how to clear the Quick Access cache in Windows 11.
- Right-click on the Start icon to open the Power User Menu.
- Choose File Explorer from the list.
- After that, copy and paste the path below into the top address bar—hit Enter.
- Now, delete all the files there and send them to the trash.
- Then, navigate to the following address. Again copy and paste it on the address bar.
- Delete everything inside that folder. If the problem was due to cache files, Quick Access should work perfectly after getting rid of them.
4. Reset Folder Options
If getting rid of the cache files weren’t enough to fix quick Access not working in Windows 11, you may need to do more than that. You have to reset the folder option. Use the following steps.
- Press the Win + E keys on the keyboard to launch File Explorer.
- Click the three-dot icon at the top and choose Options.
- Click the Restore Defaults button to reset folder options.
- Lastly, click Apply and then OK.
5. Reset Quick Access Using Registry Editor
You can use Registry Editor to reset Quick Access if it has stopped working. The Windows Registry editor is a crucial part of the operating system. So, you should proceed cautiously and back up all the registry files; creating a restore point would work even better. Here’s how to fix Quick Access not working with the Registry Editor.
- Press the Win + R keys to launch the RUN dialogue box.
- In the box, type regedit and hit Enter.
- Click Yes in the UAC (User Account Control) pop-up.
- Copy and paste the following path into the address bar on top. Hit Enter afterward.
- On the right side of the registry window, locate the QatItems entry.
- Right-click on the entry and choose Delete from the drop menu.
- Finally, click Yes to confirm. Afterward, reboot your computer.
6. Creating a New Local Account
Another unprecedented solution to fix Quick Access not working is to create a new local user account on Windows 11. So, follow the steps below to create a new local user account.
- Press the Win + I keys to launch Windows Settings.
- Click the Accounts tab on the left part of the window.
- Select Family & Other Users on the right side.
- After that, scroll down and locate Other Users.
- Click the Add Account button to add other users.
- After that, you must create an account without a Microsoft account.
- So, click on I don’t have this person’s sign-in information.
- Click the Add a user without a Microsoft Account option.
- After that, you need a name for that account and a password. Provide the name but leave the password box empty.
- After that, click Next. A new user account will be available under Other Users.
- Click the account name to access more options. Select Change Account Type.
- Then, select Administrator from the drop menu.
- Finally, click OK to finish.
Start Using Quick Access Again
The case of Quick Access not working is indeed curious. It is not a standard Windows error; it doesn’t happen to many users. Still, the users affected by this error get pretty frustrated—especially the users who use Quick Access regularly. But not to worry, our guide is available if it does happen to you. You can reset the folder options, clear the Quick access cache data, enable recent files, and enable the Jump List option in the Start settings to fix Quick Access not working in Windows 11. Additionally, create a new local user account as Administrator to restore the Quick access functionality.