Install Windows on Mac Using Parallels Desktop
To begin with, let’s sort out some fundamental questions! Once the confusion gets cleared, we will sail through the quick steps:
How Does Parallels Desktop Allow You to Install Windows on Mac?
Parallels is a software program that is designed to let you run Windows and macOS side by side on your Mac. For a more enhanced experience, the program creates a virtual machine aka a separate environment on Mac. If you want to get the most out of Parallel, you will need to subscribe to the premium version. However, if you wish to take the software for a test drive before deciding on whether to buy it or not, there is a limited freemium version with basic features.
What’s the Need to Run Windows on Mac?
There could be all sorts of reasons why you may need to get Windows on your Mac. Below are some of the major reasons.
Maybe the game that you want to play on your Mac exists only on Windows Maybe you would like to test a Windows feature Maybe you are creating an app for Windows and therefore want to see how it runs on a virtual machine Or, maybe you are planning to switch to Windows from macOS and therefore would like to take Windows 11 for a spin before taking a final call
So, What Makes Parallel a Better Program for Getting Windows on Mac?
Now, the biggest questions that may be running through your mind are why you should choose Parallels and what the pros are that make the program stand out.
To me, what gives Parallels an edge over other software programs is the painless setup and installation. Furthermore, this program does not impact the performance of your Mac or for that matter, does not slow it down. What’s more, it does not require you to partition your hard drive for installing Windows 11 on your Mac. For those uninitiated, you can partition the hard drive of your Mac into multiple sections in order to install different operating systems separately. Another notable advantage of using Parallels is that you can run Windows and Mac apps side by side. Moreover, it provides hassle-free access to a massive collection of software packages and games that are not available on macOS. You can use Windows on your Mac without putting any restrictions on macOS features. Parallels Desktop delivers comparatively better performance than using full-fledged virtual machine software packages such as Oracle VirtualBox or VMware Fusion. On top of all, you can get the most out of your Mac’s built-in FaceTime HD Camera, top-notch speakers, and higher-quality microphone in Windows apps. Long story short, it’s like having the best of both worlds: Microsoft’s impressive software and Apple’s noted hardware.
Why is Parallels Better Than Boot Camp for Installing Windows on Mac?
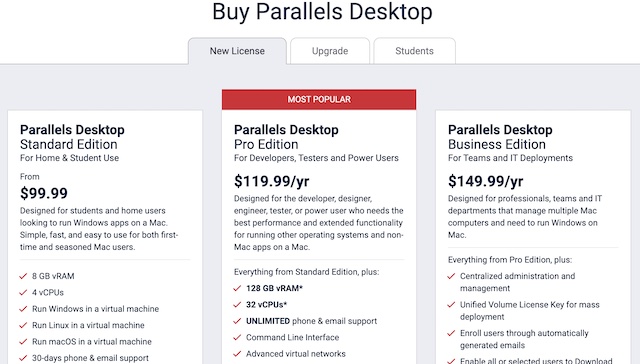
Another question that could be stuck in your mind is why Parallels is a better choice than Boot Camp -Apple’s native solution for using Windows on Mac. Though Boot Camp allows you to create a separate partition on your Mac for switching between macOS and Windows seamlessly, it has gone through a ton of changes in recent times. Keep in mind that both the latest iteration and future versions of ARM Macs won’t be able to install Windows 10 through Boot Camp. Parallels Desktop is a better pick if you are planning to run a Windows VM on your ARM-powered or any other Mac. Not to mention, the software program works with Intel-based Mac computers without any limitations. Don’t get me wrong, Boot Camp is available for free and offers a secure way to get the most out of Windows on Mac. While Parallels’ freemium version provides a limited free trial. And you must upgrade to the premium version to unlock all the features which makes it suitable only for pros or folks who want to dive deep. Parallels Desktop comes in three variants. While the standard edition is available for $99.99, the production retails at $119.99/year. As for the business edition, it comes at a whopping price of $149.99/year.
Step-By-Step Guide to Installing Windows on Mac Using Parallels
- To get started, download and install Parallels Desktop on your Mac. Since it’s a Mac app, you can download it from the Mac App Store. Besides, you can also choose to download it from the official website.
- After you have installed Parallels, launch it.
- Then after, you will be asked to enter your activation key. If you don’t have an activation, you can get a free 14-day trial.
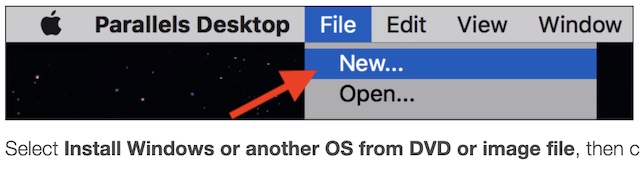
- Next, create a “virtual machine” for the Windows operating system.
- To do so, open the Parallels application -> File and click New.
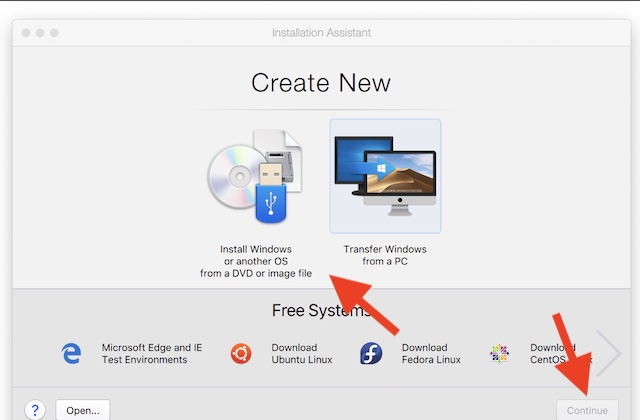
- Next up, click the Install Windows or another OS from the DVD or image file icon. Then, click Continue to proceed.
- Up next, Parallels should automatically detect the installation file.
- Just in case the software doesn’t automatically find the Windows installation file, click the Locate Manually button and then choose the option where the file is stored. For instance, you have multiple options to choose from such as DVD, USB drive, or Image File.
Note that if you have saved the Windows installer program saved on a DVD or USB flash drive, choose one of them. Keep in mind that if you have downloaded it directly to your computer, hit the Image File to open the installer (called a .iso disc image).
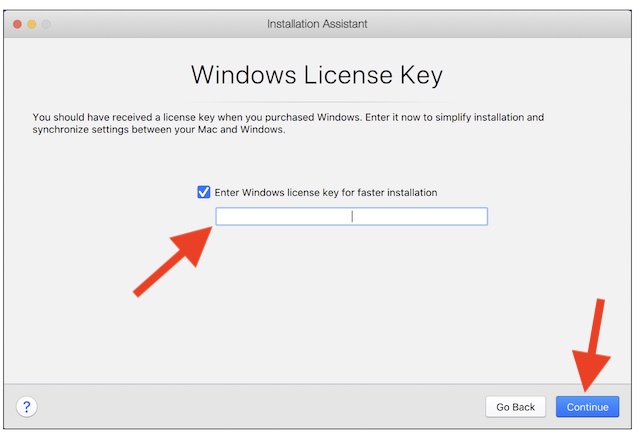
- Now, enter the code and then hit Continue.
It’s worth pointing out that you can find the Windows software product key on the retail packa]ge or in the confirmation email. The product key is usually a 25-character code that consists of letters and numbers.
- Make sure to leave Express Installation checked off. Otherwise, you will need to manually install “Parallels Tools” later.
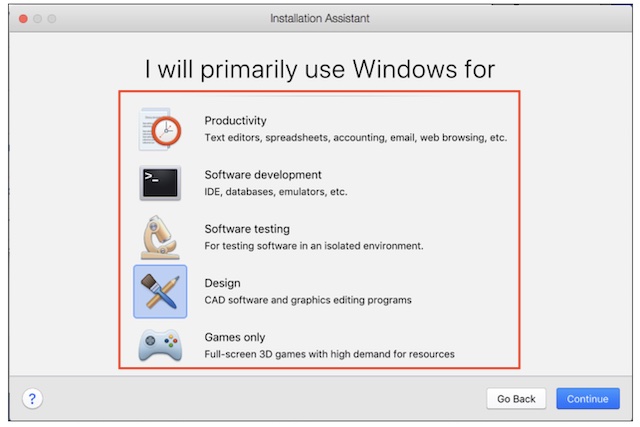
As there are multiple ways to use Windows on Mac, you have the flexibility to choose the desired method that suits your workflow the best. Moreover, Parallels also optimizes Windows to provide a more personalized experience. Parallels Desktop Lite is designed for things like gaming, productivity, software development, and graphic design. As for Parallels Desktop, it comes with the added benefit of optimizing Windows for Software Testing.
- Next, give your virtual machine a suitable name and choose where you want it to be saved. Since there is absolutely no restriction with regard to naming, you have the complete freedom to go with a name that is in line with your preference.
- It’s important to note that Parallels, by default, saves your virtual machine in its own folder located inside Mac’s Documents folder. However, you can change the location. To do so, click on Customize settings before installation and choose the preferred location.
- One of the coolest things about Parallels Desktop is that it allows you to share your installation of Windows with other user accounts on your Mac. To get it done, click on Share and then follow the instructions to share it with other Mac users.
- When you are pleased with everything, hit Continue.
- Next, your macOS device will start installing the Windows system. It’s time to go through the on-screen instructions to complete the process.
- After the installation gets over, open the app or hit the Power button from the list of virtual machines on Parallels to launch Windows on your Mac.
When you open Windows for the first time, your Mac will automatically install “Parallels Tools”. With the Parallels Tools installed, your Mac computer will be able to switch between macOS and Windows with the needed flair. Hence, I would recommend you allow all the tools to get installed without any interruption. You will be prompted to reboot Windows when the installation is done. Later, if you ever need to upgrade the version of Windows on your Mac, all you need to do is run the upgrade installation file on the latest Windows virtual machine. Be sure to choose the correct upgrade that supports your current Windows (whether 32 or 64-bit). Besides, you must make sure that you have a sufficient amount of memory and hard disk space allotted to your virtual machine to complete the whole installation process.
Install Windows on a Mac with Apple M-Series Chip
Installing Windows on an Apple-silicon-powered Mac is pretty straightforward as well.
To get going, install Windows 11 ARM. To do so, launch Parallels Desktop on your Mac. After that, click on the Parallels icon in the Mac menu bar and choose the Control Center. Now, click on the “+” and hit Get Windows 11 from Microsoft. Next, click on Continue and select Install Windows. Now, Windows will be downloaded and installed automatically on your Mac. After the installation process gets over, you should see the Installation Complete prompt. When you unlock it, you will get the Microsoft EULA. After that, click I accept to complete the process. Next up, you need to activate Windows 11. To do so, you need to select an existing Windows 10 license or buy a new Windows 10/11 license from the Microsoft Store.
Purchase a New Windows Licence Using Parallels on Mac
To purchase a new license, head over to Windows Settings > System > Activation. Next, click on “Get a new license in the Microsoft Store app”. Then, click “Buy” and then follow the instructions to complete the process. As soon as the purchase is done, Windows will be automatically activated.
Activate Existing Windows License Using Parallels on Mac
It’s just as easy to activate an existing Windows license using Parallels.
Head into the Windows Settings > System > Activation. Now, click “Troubleshoot” and then hit “I changed hardware on this device recently” in the prompt. Next, you need to sign in to your Microsoft account. Next up, press Enter when asked for the existing Windows password. Up next, make sure to check the option “This is the device I’m using right now” and hit “Activate”. That’s pretty much it! Windows will be successfully activated on your device.
My Thoughts…
So, that concludes this hands-on guide about running Windows on Mac with Parallels. Without an iota of doubt, Windows and macOS are the two most popular operating systems for computers. As to which one is better, it all comes down to your personal choice. While Windows is known for a ton of customization and flexibility, macOS is touted to deliver a more seamless and secure experience. If you are a gamer who loves to try a plethora of exciting games with enhanced freedom, Windows should be a preferred choice. And if you want fully-optimized software that can provide a smooth, responsive and secure performance, macOS is the way to go. Well, that’s my thought. What about yours? It would be nice to know your two cents as well. Read more: How to Enable and Use Night Shift on Mac