Erase Objects from Photos on iPhone and iPad (Hands-On Guide)
Wondering how the object removal tool works? Well, let’s first sort out the confusion!
So, How Does the Object Removal Tool Work on iPhone and iPad?
In order to erase an object from images, we are going to use a third-party object removal app. Since the App Store is loaded with a ton of object eraser apps, it’s not a big deal to find an app that can live up to your task. What’s more, many object eraser tools are available for free and support even older operating systems like iOS 15, iOS 14, iOS 13, etc. So, even if you are still using an older version of iOS, you can edit your image without having to shell out any bucks.
Which are the Best Object Eraser Apps for iPhone and iPad?
As I stated above, the App Store is flooded with a plethora of object eraser apps for iPhone. However, not all of them live up to the tall claim. Having tested several apps, I have picked out the following ones as the preferred choice.
Photo Eraser: Available for free and supports iPhone, iPad, and iPod touch running iOS 12 or later. Photo Retouch – Object Removal: Free, supports iPhone, iPad, and iPod touch running iOS 12.1 or later. Object Removal: Free, compatible with iPhone, iPad, and iPod touch running iOS 13 or later.
All these apps are pretty easy to use and allow you to wipe out unwanted things with the desired control. Hence, you can pick any of these apps to edit your photos.
Quick Steps to Erase Objects from Images on iPhone and iPad
For the purpose of this guide, I’m going to use the Photo Eraser app.
- To get going, make sure to download the Photo Eraser app on your iPhone or iPad.
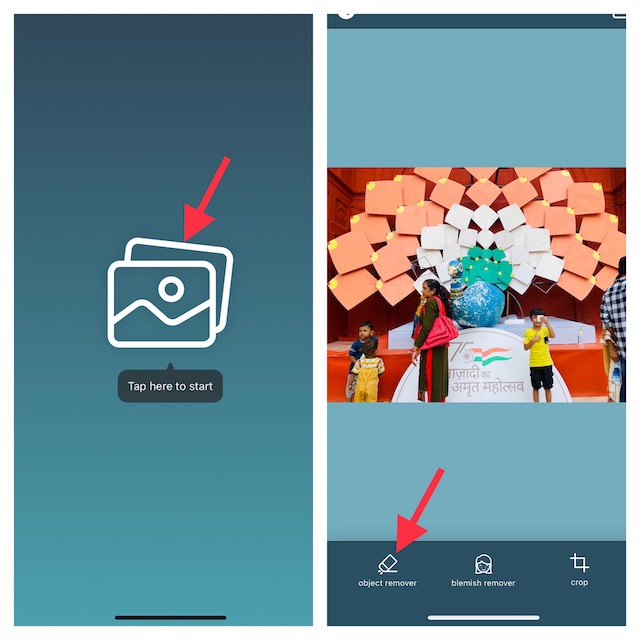
- Now, hit the Image button that shows right in the middle of the screen.
- Next, you need to choose an image that would like to edit from your photos library.
- Next up, hit the Object Removal tab that appears at the bottom of the interface.
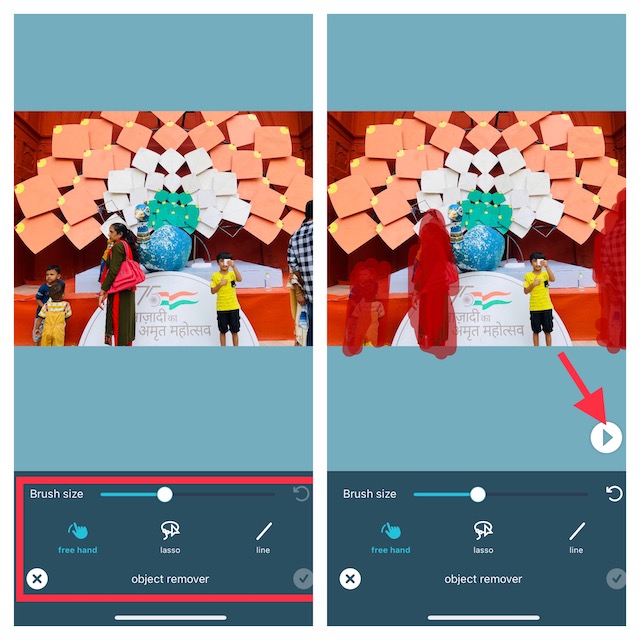
- Up next, you can adjust the brush size by dragging the slider left/right. Besides, you can also choose to use the three different tools such as, “free hand”, “lasso”, and “line” to hide all the redundant things.
- Once you have hidden all the unwanted objects from the image, tap on the Play button at the bottom right corner of the interface. Awesome! The app will immediately get rid of all the hidden objects from the image.
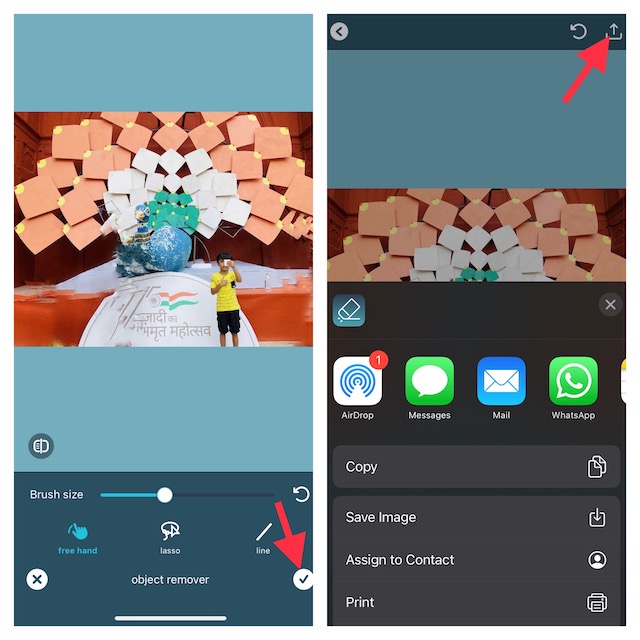
- Now, you can tap on the check mark located at the bottom right corner of the screen to finish.
- Finally, the share button at the top right corner of the screen to share the edited photo or save it to your photo library as per your needs.
Wrapping Up…
And that’s about it! Even though the stock photos app lacks the tool to erase unwanted things, third-party apps more than just fill up the void. Not to mention, many of them are also available for free, which is yet another plus. Therefore, you can adorn your images without having to burn a hole in your pocket. That said, did you find this guide helpful? If yes, make sure to share your feedback in the comments below. Read more:
How to Extract Subjects from Photos on iPhone in iOS 16How to Hide Photos in iOS 16 on iPhone and iPad