This feature is ideal for kids or visitors who often trespass their boundaries. Read on to see how to activate and use Guided Access on iPhone.
What is Guided Access, and why should you use it?How to set up Guided Access on your iPhone or iPadControl features on Guided AccessHow to end a Guided Access session
What is Guided Access, and why should you use it?
Guided Access is a restriction feature on the iPhone that prevents users (non-owners) from leaving an app or using other functions unless the owner permits them. It’s the best way to restrict movement for your ward on the iPhone. It lets you lock your iPhone to only one app at a time and even prevents the current user from locking the iPhone, using the volume buttons, viewing notifications, or flipping up the Control Center unless you permit them or remove the restriction via Face ID or passcode.
How to set up Guided Access on your iPhone or iPad
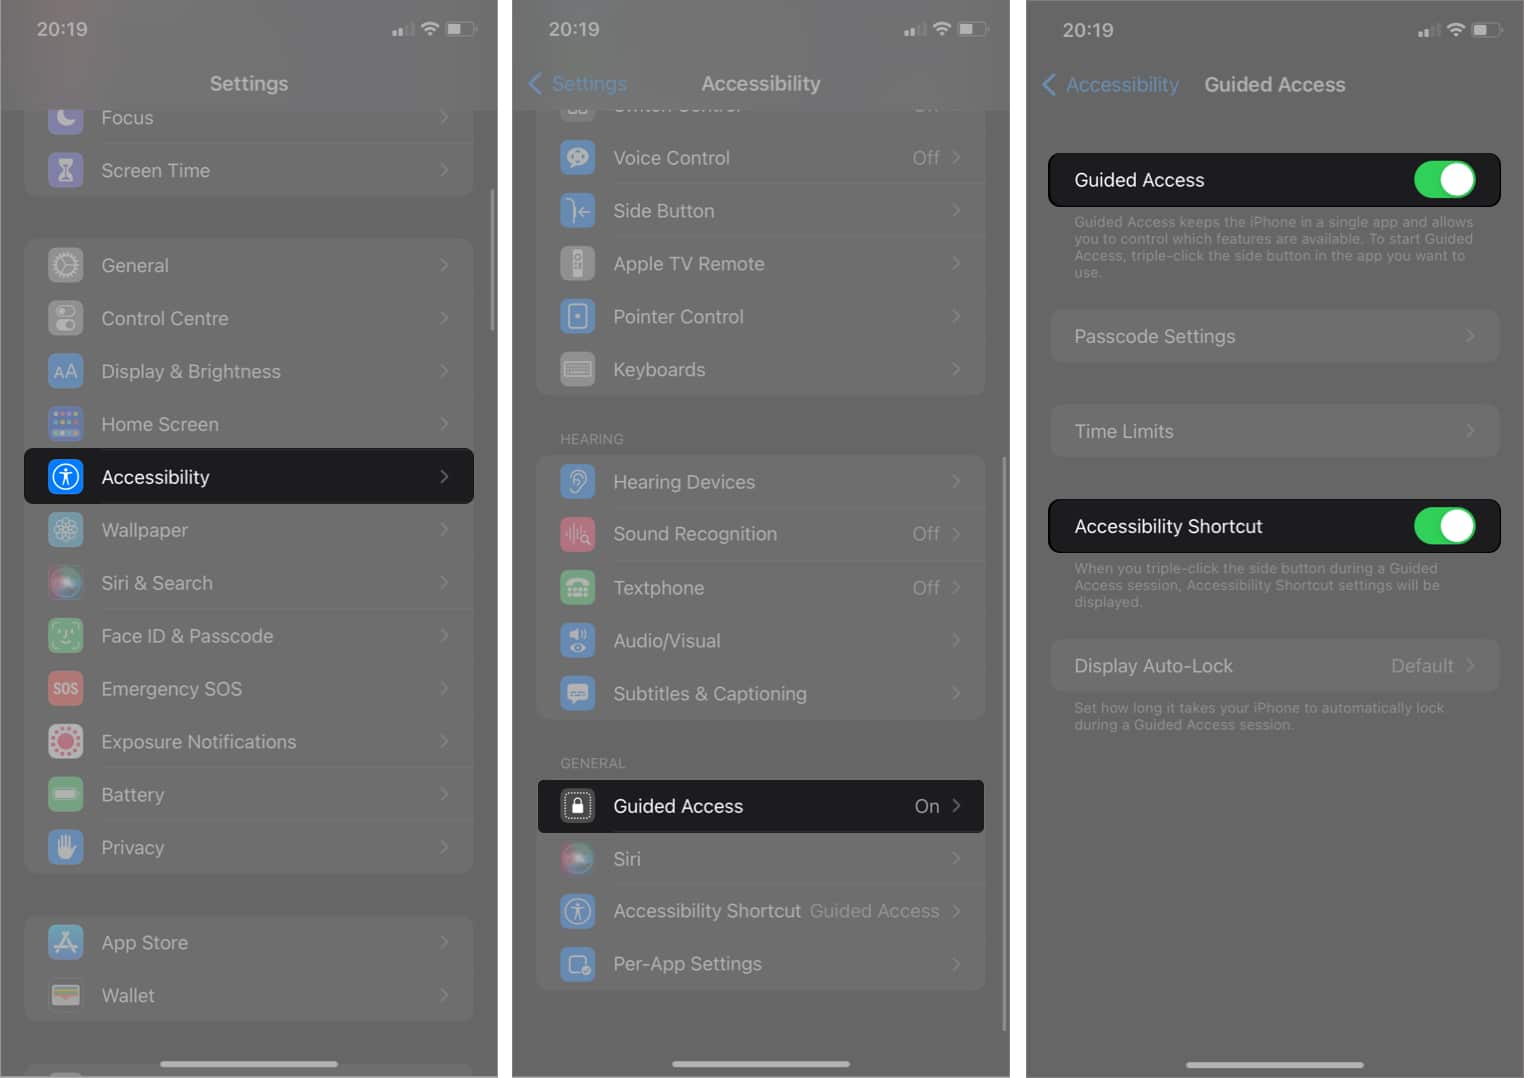
To set up Guided Access on the iPhone, you simply need to activate it from Settings. Here’s how: You can now set up other configurations like session time limits, passcode settings, and auto-lock timer. You’ll see how to go about these below.
Set up a passcode or Face ID for Guided Access
Further, you’ll have to set up your Face ID or passcode, if not already, to make Guided Access more secure. The Face ID is usually enough to authenticate Guided Access on the iPhone. But you can set up a passcode for it if you fear Face ID may sometimes fail. Here’s how: You can now either use the passcode you set or your Face ID with Guided Access.
Set a time for iPhone or iPad auto-lock on Guided Access
Another excellent feature of Guided Access is that it allows you to set an auto-lock time limit. So once this timeframe elapses, your iPhone’s screen will lock itself automatically. You can set your iPhone or iPad to auto-lock on Guided Access after a chosen time limit by going to Settings → Accessibility → Guided Access → Display Auto-Lock. Select a timeframe from the options. You can select Never to prevent your iPhone from locking the screen whenever you activate Guided Access.
How to limit iPhone to a single app with Guided Access
Once you activate Guided Access, open any app on your iPhone or iPad and follow the below steps to lock it to a single app: You’ll get a message that says, “Guide Access Started.”
Control features on Guided Access
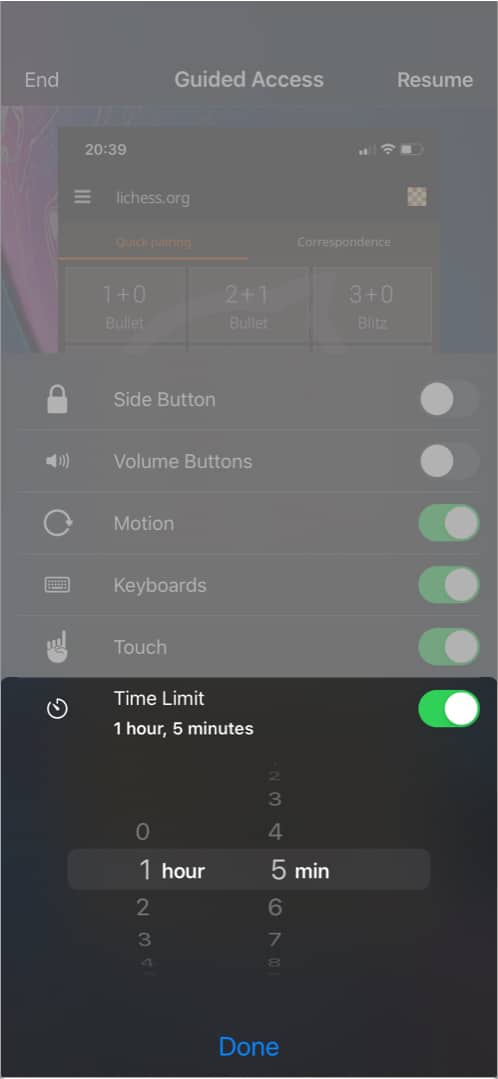
As stated earlier, iPhone’s Guided Access limits what someone can do on the iPhone. These include restrictions against using functions like the power, volume buttons, and keyboard. But sometimes, you might want people to use certain features. To allow someone to control certain features when your iPhone is on a Guided Access session: For instance, if you switch on Volume Buttons, Side Buttons, or the Keyboard, the current user can control these features whenever Guided Access is active.
Set a time limit for Guided Access on iPhone or iPad
You can also specify a time cap for Guided Access. So when this time elapses, the Guided Access session ends automatically. You’ll see this option while starting a new Guided Access session: Guided Access will now last for the set time unless you stop it.
How to end a Guided Access session
Double-press the side button. You’ll get a message that says, “Guided Access Ended,” reverting your iPhone to its normal usage. That’s it! Guided Access offers extra content protection on the iPhone, and it’s an excellent privacy feature you should try out, especially if your ward must use your iPhone. This is how you can set up and use Guided Access on iPhone. Got any comments or questions for me? Drop it in the comments below. Read more:
Best parenting apps for iPhone and iPadSome super cool interactive iPad apps for kidsUtility apps for iPhone and iPad to increase your productivity