Windows 10 is the fresh Windows OS available in the market. Microsoft offers users pre-release build of Windows 10 if you enroll for Windows Insider Program. Using these builds, you can enjoy all the upcoming features of the operating system before the final version of the update made public by Microsoft. Following the traditions, a small watermark having information about Windows 10 editions and build number appears on the bottom right corner of the desktop. The purpose of adding this watermark is to remind users that they’re running a pre-release build of the Windows 10 and the same is released just for evaluation purpose. However, the watermark is tiny and does not capture lots of space on the desktop. The same Windows 10 watermark is not even annoying. Even if you’re using a light color desktop background, then the watermark is hardly visible to users. Still, their users who might be looking for Windows 10 watermark remover. Right? The process of removing a Windows 10 watermark from the desktop is not easy as there is no option available on the Windows 10 settings or Control Panel app to remove watermark from the desktop. Even no default Watermark remover app comes preinstalled in Windows 10, then how to remove Windows 10 build watermark? To remove Windows 10 watermark from the desktop, you need to take help of freeware third-party Windows 10 watermark remover named as Universal Watermark Disabler
Universal Watermark Disabler – The Windows 10 Watermark Remover
Universal Watermark Disabler is a free application for Windows 10 using which you can remove any watermark. The app has an installer that will set up all the things in Windows 10 OS. To remove watermark from Windows 10, you need to follow these instructions:
- First of all, use this link to download Universal Watermark Disabler.
- Extract the zip file using default archiving tool for Windows 10. You can also take help of any other third-party software. You will get the folder named as UWD.
- Open the folder and run UWD app available in the folder. When UAC dialog box appears in the search result, Click Yes to continue.
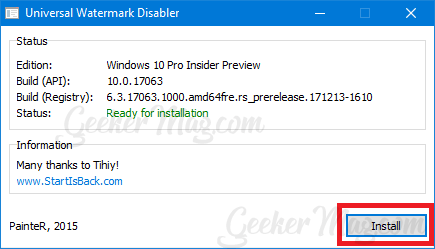
- Universal Watermark Disabler app dialog box will appear with information about what edition and build of Windows 10 user currently running. You can check the following screenshot for a clear idea:
- In the app dialog box, you need to click on the Install button available in the bottom right corner. Warning dialogue box will appear with the message, i.e., “You’re going to install on the untested build. Continue?” Click on Yes button. The screen will go blue, and you will get the message telling that the system will perform automatic signout. In few seconds it will take you a Windows 10 login screen. Here login using your credentials. Now you will notice that the Universal Watermark Disabler has successfully removed Windows 10 watermark. In case, for whatever reason you want the same watermark back, just run the application and click on Uninstall button. And you will get the Windows 10 build and editions watermark back. Universal Watermark Disable is the best Windows 10 Watermark Remover available on the internet, and I hope you find this useful. In case, you have any other alternative tool, let me know in the comments.