Once you run a quick scan using System file Checker, it looks for protected system files and if it finds any files that are missing or corrupted, then it looks for those files in the Windows Image component store and replaces them with the correct version.
As a result fix any issue, especially if it is caused by corrupt or missing files in the system.
Use System File Checker (SFC) to Repair System Files in Windows 11
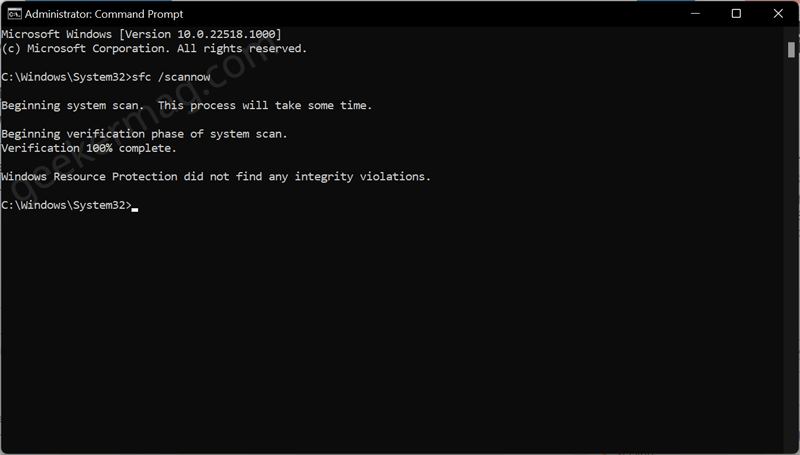
If you are facing any issue in Windows 11 PC, then the first thing you should do is use a system file checker to repair system files in Windows 11. Here’s how you can do that: Click on the Search icon on the taskbar, and then type CMD, when Command Prompt appears in results, click on the Run as administrator from the menu. When the UAC dialog box appears, click Yes to continue. Doing this will launch Command Prompt with administrative privileges. In the Command Prompt, type the command sfc /scannow and hit Enter. This will run the system file checker on your PC. Wait till the status reach 100% and then close the Command Prompt. Once the process is completed, you will get a message that reads “Windows Resource Protection did not find any integrity violations“, this confirms that everything working fine. On the other hand, if you receive a message “Windows Resource Protection found corrupt files but was unable to fix some of them“, then you can do the following things:
Run System file check againUse Deployment Image Servicing and Management Tool (DISM) to repair Windows imageRestore your computer to earlier datePerform In-place upgrade of Windows 11If nothing works, reset your Windows 11 PC.
Check out the YouTube video on how to do that:
System file checker errors in Windows 11
Sometimes it is possible to System file checker fails to run and you will see the following errors: “Windows Resource Protection could not perform the requested operation.” and “Windows Resource Protection could not start the repair service.“ It’s because the background service which helps in initiating the scan is not running. To fix, launch Services windows and restart Windows Module Installer service.
Repair Windows 11 with offline SFC scan at boot
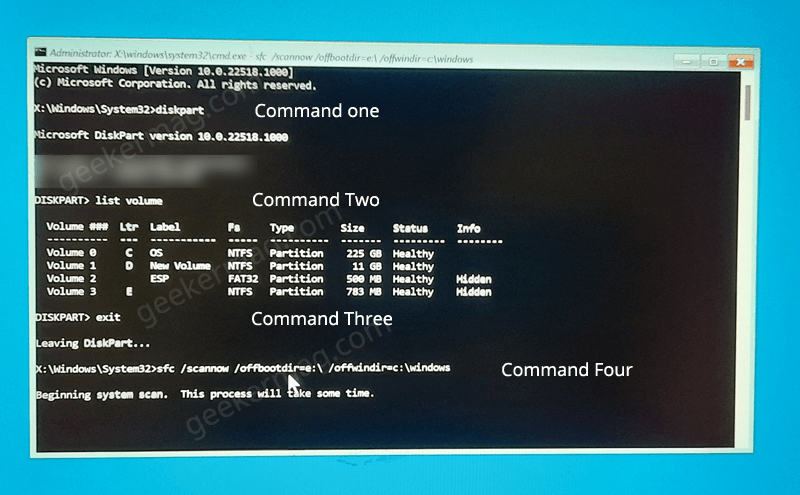
You can also run System file Checker from Windows Recovery Environment (WinRE) in Windows 11. Here’s how you can do that: First of all, boot your PC in Windows 11 Recovery Environment In the Advanced options screen, you need to select Command Prompt. Here, you need to execute the following commands back to back: Diskpart List volume With the above command, you will get a list of all the volumes on your Windows 11 PC. Most of the time, C: is going to be your system partition, and E: is going to be the recovery partition usually around 500-700 MB in size. Note the drives as we need in the upcoming step. Now, type exit to leave diskpart To start a System file checker, you need to execute this command: sfc /scannow /offbootdir=“recovery boot partition drive letter”:\ /offwindir=“Windows 11 system partition letter”:\Windows Above is the basic command and after entering drive letter this is how it going to look like: sfc /scannow /offbootdir=E:\ /offwindir=<C:\Windows hit enter and this will run the tool. Wait for the process to complete. You can run System File checker in both Windows Powershell and Command Prompt. So you can also use Windows Terminal to execute sfc /scannow command.